Powering the Muffsy Phono Stage
A good dual power supply is essential for this phono stage. You can use the Muffsy Hifi Dual Power Supply, or one of the two other options offered here.
By now, you should have a completed Muffsy Phono Stage, a back panel and a power supply. These will all be connected in these instructions.
Please note that Option 1 is the only supported solution by muffsy.com. Batteries tend to not last very long (see the note in "Option 2", and other power supplies vary too much in design, connections and quality to be supported by us.
In other words: Use the Muffsy Power Supply if you are unsure about how to use the other options.
Option 1: The Muffsy Hifi Dual Power Supply
The Muffsy Hifi Dual Power Supply is really great. It offers +/- 15V regulated power with only 0.1 mV ripple.
This is how you connect the power supply to your phono stage and back panel:
.png)
Wiring the Power on the Muffsy Back Panel
Start by soldering a short wire (Size: 15-20 AWG, or 0.5-1.5mm) between the oddly shaped pin on the power connector to the power button:
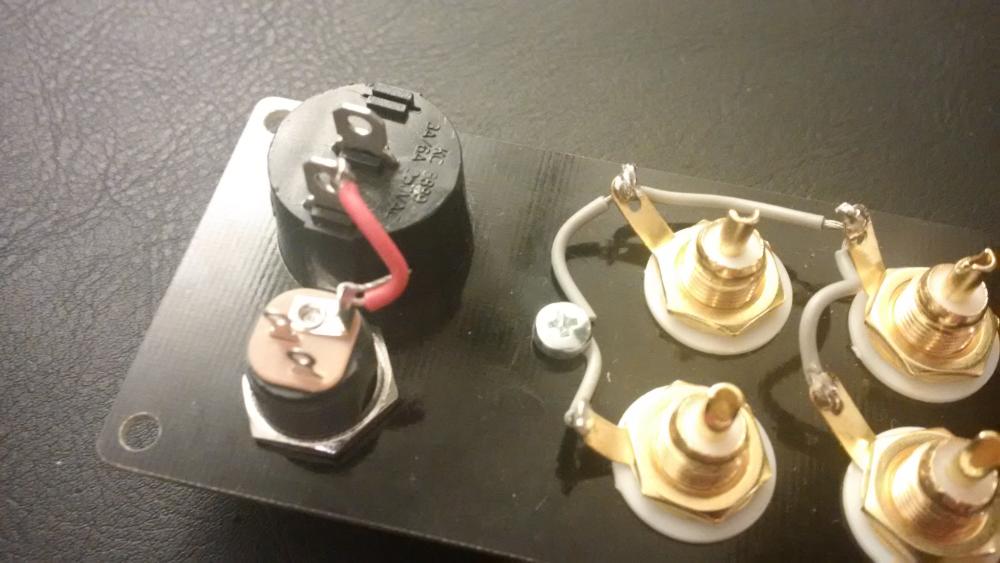
Cut two cables, 15-20 cm/6-7 inches, solder the first cable to the other pin of the power button.
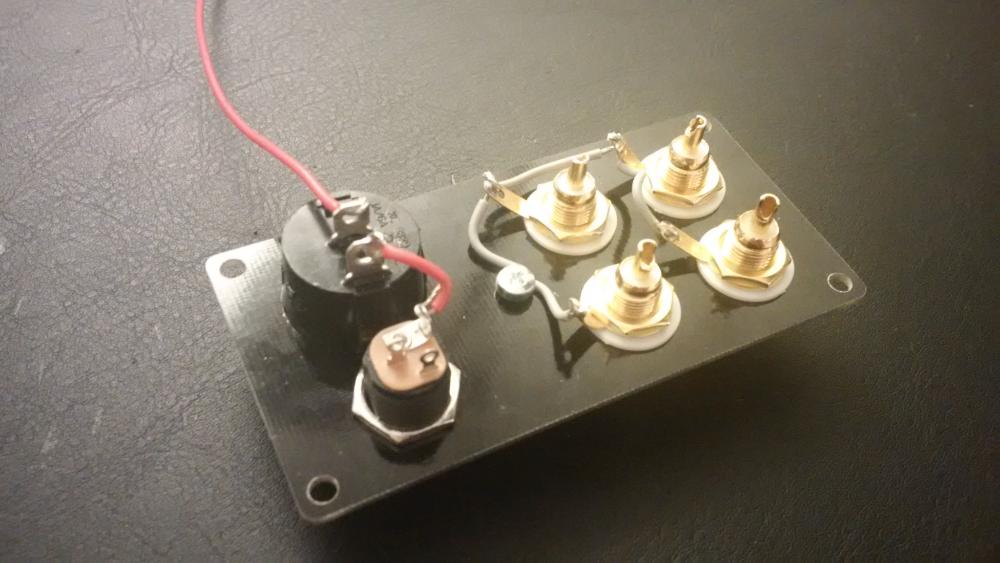
Solder the second cable to the bottom pin of the power connector (the next one, going clockwise).
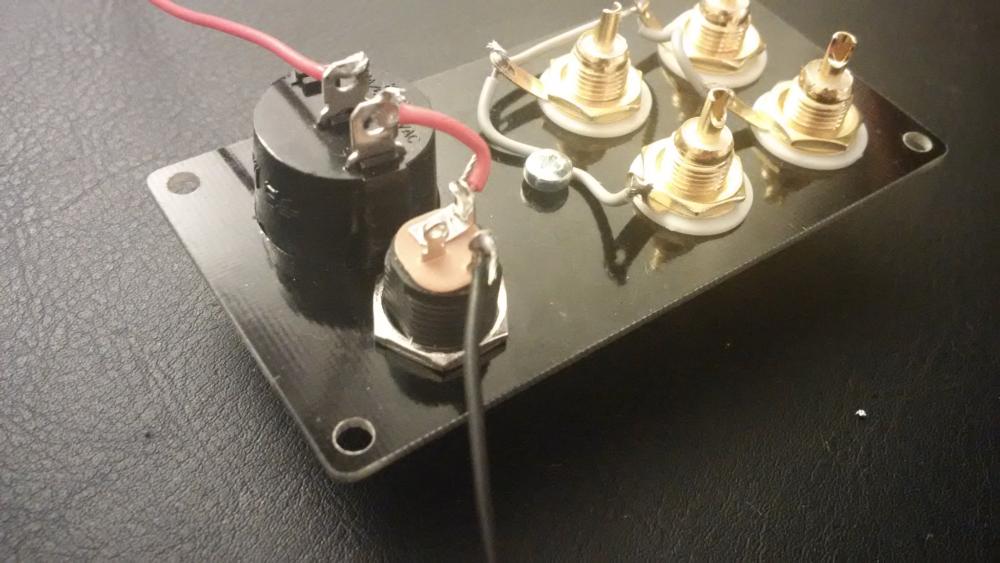
Twist the two cables tightly, cut it to length so it will reach the power supply board. Both cables carry the same power, orientation does not matter.
Connect the two cables to the power supply board, and the back panel power connector and power button is complete.
Power the Muffsy Phono Preamp
The power supply outputs are +/-15 volts and ground. Use three cables of different colors to tell them apart. The picture below uses:
- RED: +15 volts
- BLUE: Ground
- BLACK: -15 volts
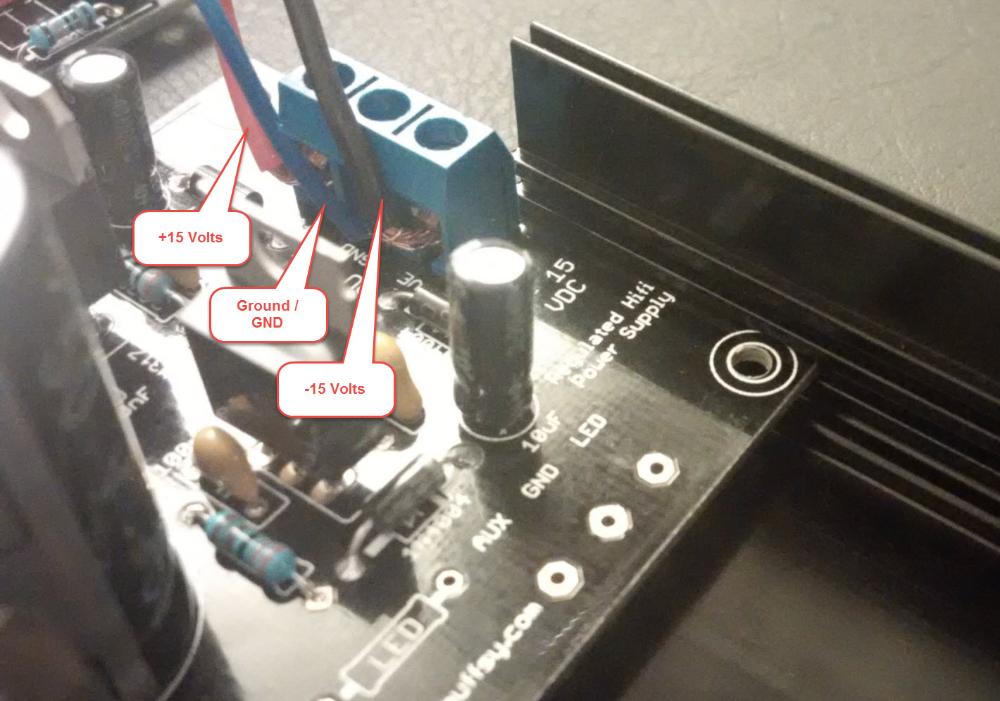
Connect these three cables to the Muffsy Phono Preamp, as indicated on the picture below. You should braid or twist the cables, to get optimal shielding.
NOTE:
Make absolutely sure that the cables are connected correctly before powering on the equipment. Failure to do so will damage the power supply, and possibly the phono stage too!

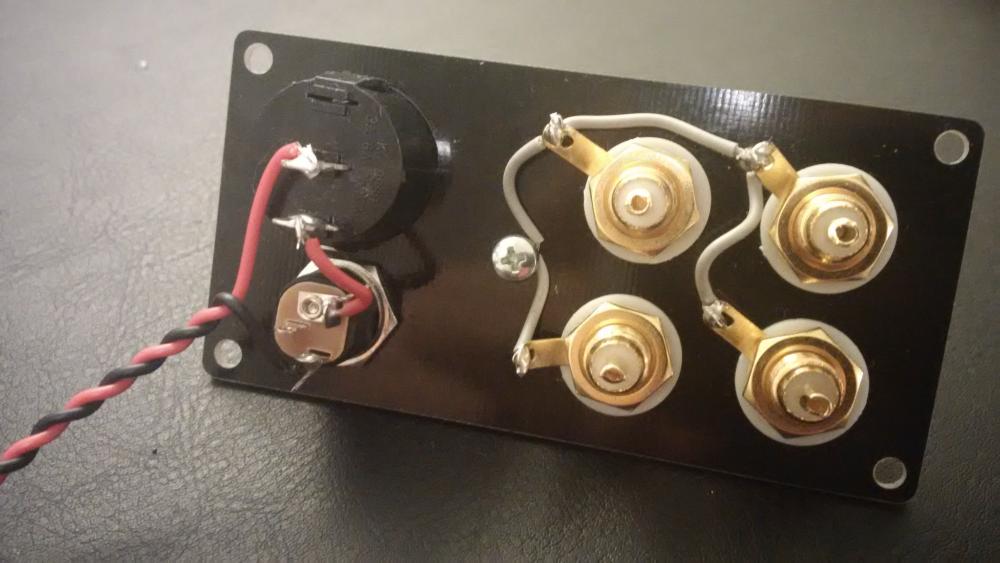
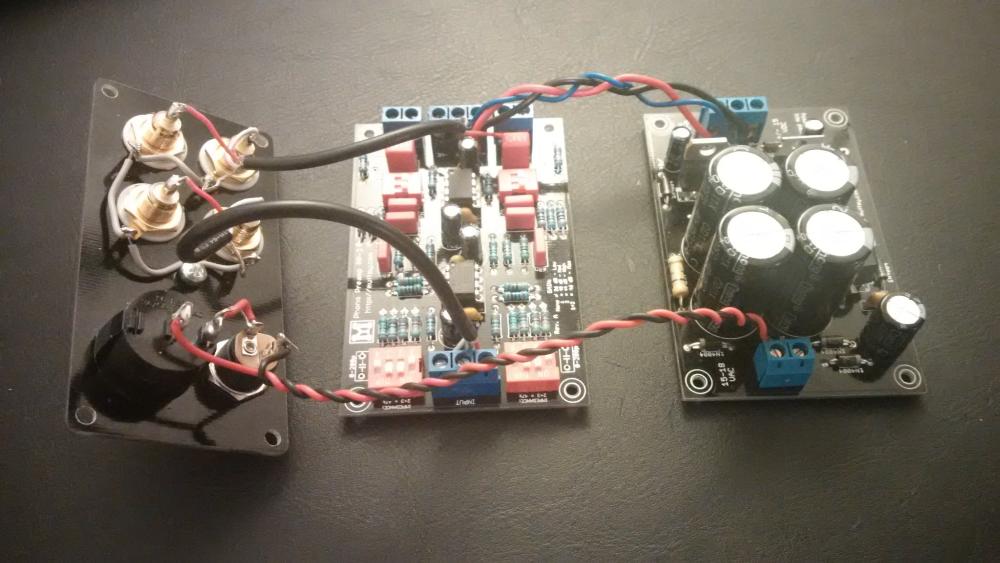
Power Cabling Completed
The picture below shows all cabling completed.
Option 2: Battery Power
The Muffsy Phono Stage can also run on two 9V batteries, or even two 12V SLA batteries if you'd like. As long as you remember to turn it off, the phono stage will run for weeks on battery power.
Battery Life
The Muffsy will draw power as long as it's powered on. You are advised to use a power switch as shown below to preserve battery life.
Ordinary 9V batteries will last between 30 and 40 hours. This will let you listen to about 50 full records before having to replace the batteries. Using two 5 Ah, 12V SLA batteries will provide about two and a half weeks of power, and they're rechargeable.
Here's how to power the Muffsy Phono Preamp with batteries, referring to the picture below:
- GND: Connect the positive side of one battery to the negative side on the other battery.
- +VE: The remaining positive side is your +VE.
- -VE:The remaining negative side is your -VE.

This will power your phono stage, but you would most probably want to be able to turn it off. The picture above is great for understanding exactly how the batteries are connected though.
The picture below shows how to add a power switch to this circuit, using a DPDT switch to turn off both +VE and -VE:
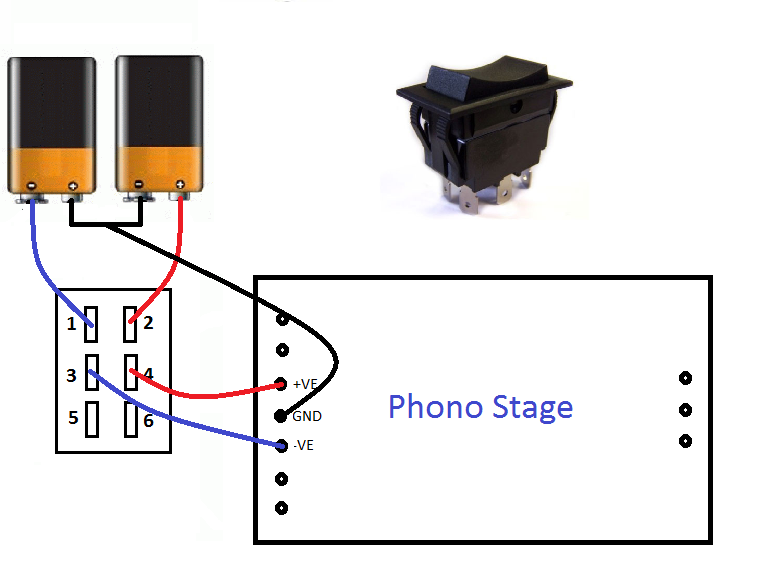
If all you have is a SPST (single pole, single throw) power switch, you could get away with only breaking the ground connection. Make sure that you don't just break only the +VE or -VE connection, as that will just disconnect one of the batteries.
Option 3: DC to DC Converter
The first two options were either an AC power that was converted to dual DC, or two separate batteries. There's another way that's quite neat as well. On paper, it should be quite a lot worse than the other two. We'll see that it might be a good option after all.
I was in the position where I powered a class D amplifier with an old 19.5 volts laptop power supply, and I wanted to add the phono stage to this setup. A voltage divider was not an option, as the virtual ground and real ground would connect. Not wanting to short-circuit everything, I had to find another solution.
Enter the WRD isolated and regulated, twin output DC/DC converter.
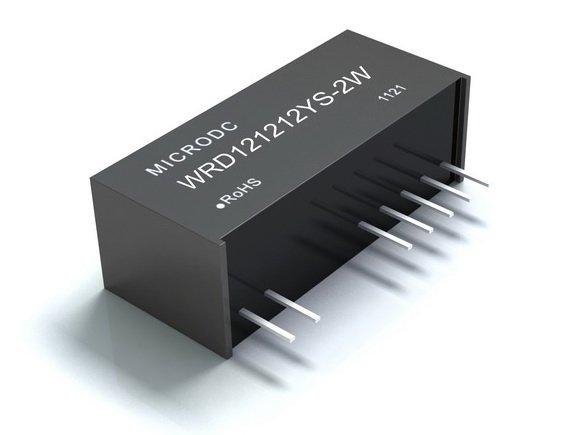
It comes in different variations, and can be powered by 5, 12, 24 or 48VDC. The output will be twin 5, 9, 12 or 15VDC.
I chose the WRD241212YS-2W, because it accepted an input voltage of 18-36VDC. The output is a twin 12VDC. (The WRD121212YS-2W will accept 9-18VDC in, and will also provide 2x12V out.)
Make sure you choose the 2 watt version to get sufficient power for the CNC. The 2 watt version will power two CNC boards with power to spare, but you'll want that extra headroom.
The twin outputs are really comparable to two batteries, as they provide two independent 12 volt power supplies.
Here's how to wire the WRD, complete with (an SPST) power switch:
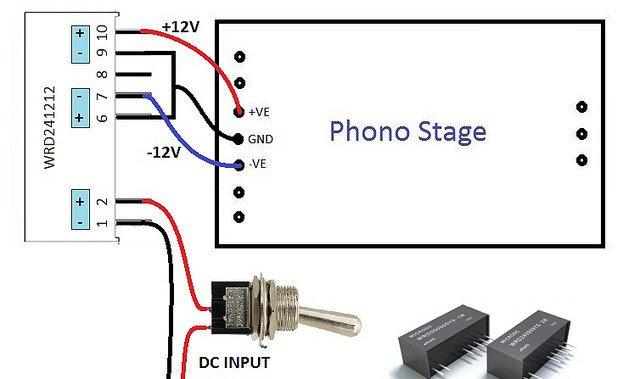
(The WRD PSU is much larger on this picture than it is in real life, just to make the wiring easier to see.)
The output power is completely isolated from the input power. The ground connected to the CNC (which is really the positive side on one PSU connected to the negative side on the other) can be connected to the INPUT DC ground without any worries. This is really helpful if you want to trace down and get rid of any ground loops.
So why is this the worst (on paper) solution? The WRD power supply has a very high ripple. up to 50mV, which is 500 times as much as the Muffsy power supply. That is quite a bit worse, to be honest.
The phono stage's onboard bypass capacitors will filter away much of this ripple, and the ripple rejection of the operational amplifiers takes care of the rest. I have used this solution, and it is absolutely impressively silent.
Option 4 - Step-Down Converter
This fourth option is described on the blog. It uses two step-down converters to provide +/-12 volts.


In this configuration, you can power the Muffsy Phono Kits with a 15V DC power adapter. It's got a ripple comparable to the DC-to-DC converter, use the Muffsy Power Supply to achieve the best results. It's handy if you're really strapped for space though.
Construction Complete
With the phono preamp, back panel and powering done, it looks like this:
It does look like something that can be used as a phono stage, doesn't it? All that's left now is to proceed to the final instruction, to complete your phono stage: